
Resources is where the people, organizations and things your work runs on live: contacts, organizations, materials, equipment, costs and subscriptions. Add them once, then pull them onto tasks, projects and programs, where their costs add up and their stock counts itself.
It also holds any Smart List you've turned into a section, and the groups you file things into. Everything you'd otherwise keep in six spreadsheets and one person's head.
Open it from Resources in the left menu. It comes with every plan. On Free, the six sections hold 50 records between them and the workspace can have 2 groups.
Three questions Resources answers
The lay of the land
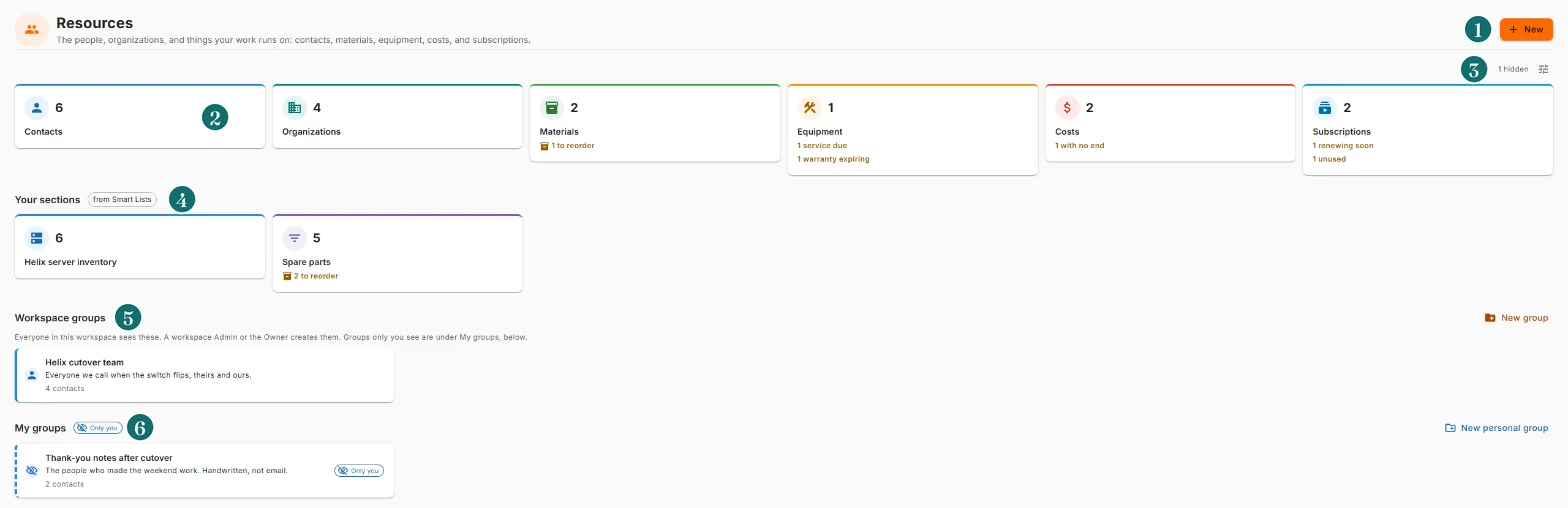
- New. Start a new record in any of the six sections.
- The six sections, each with how many records you can see, plus anything that needs attention.
- Arrange sections, to reorder or hide them.
- Your sections: Smart Lists you've turned into sections.
- Workspace groups, which everyone sees.
- My groups, which only you see.
When you delete a section made from a Smart List, a Recently deleted sections panel appears here too. More on that below.
The six sections
| Section | What goes in it |
|---|---|
| Contacts | People: your team, the client's team, the vendor who always picks up. A contact can carry an hourly cost |
| Organizations | Companies: clients, suppliers, manufacturers, vendors |
| Materials | Things you use up: cable, parts, consumables. On Pro, each has a stock card |
| Equipment | Things you use and keep: test kits, laptops, a van. Service dates and warranty live here |
| Costs | Money going out: travel, a one-off purchase, a weekly expense |
| Subscriptions | Money going out on repeat: software seats, cloud services, licences |
Needs attention
The links under a section's tile, like 1 service due or 2 to reorder, are Nexus doing the remembering. Click one and the section opens filtered to just those records. The same words show as a chip on the record itself.
| Section | Flag | When |
|---|---|---|
| Materials | to reorder | Available stock is at or under the reorder point (Pro) |
| Materials | to order | Upcoming work needs more than is available, and the lead time says order now |
| Equipment | service due | The next service is in the next 14 days |
| Equipment | service overdue | The next service date has passed |
| Equipment | warranty expiring | The warranty ends in the next 30 days |
| Equipment | unavailable but committed | Marked unavailable, but still on open work |
| Subscriptions | renewing soon | It renews automatically in the next 14 days |
| Subscriptions | unused | Active and auto-renewing, but no task, project or program uses it |
| Costs | with no end | It repeats with no number of occurrences, so it never stops |
| Contacts | inactive but assigned | Marked inactive, but still holding open work |
| Contacts | with no rate | On an open project with no hourly cost, so their time adds nothing to its cost |
Service overdue, unavailable but committed, and inactive but assigned show in red. The rest are amber. Organizations never need attention. They're organizations.
Arranging the page
The tune icon above the tiles opens Arrange sections. Use the arrows to reorder, and the eye to hide a section you never use. A hidden section is still there; it just stays off this page. Reset puts everything back.
A section's list
Click a tile to open the section.

- Search looks through the main fields: names, email, job title, SKU, category and so on. It doesn't search custom fields.
- The star shows only the records you've starred. Stars are yours alone.
- Stock (Materials, on Pro): All stock, Needs reorder, Below minimum, Negative or Over maximum. Needs reorder catches the first three together.
- Everything narrows to one of the section's needs-attention flags.
- Group by lists records under the organization they point at: Group by employer, supplier, manufacturer, vendor or provider. Only these beside a heading keeps just that group.
- Sort by Name, Created or Modified, with the arrow for the direction.
- Cards, List, Grid or Kanban.
Every filter you set shows as a chip under the toolbar, with Clear all to start over. Long sections show 24 records a page.
The views
- Cards and List show each record's name and its most useful details.
- Grid shows a column for every field on the form. On Materials it adds Available and Stock, and on Costs a Total at the bottom, per currency.
- Kanban is a board with one column per option of a dropdown field. Drag a card to another column to change the value. A workspace Admin sets it up in Customize (below), by making Kanban the default view and choosing the field for its columns. Until then the button is greyed out.
Adding a record
Click New on the Resources page, or New Material (or Contact, and so on) on a section's list. Fill in the form and click Create. The record opens, ready for the rest.
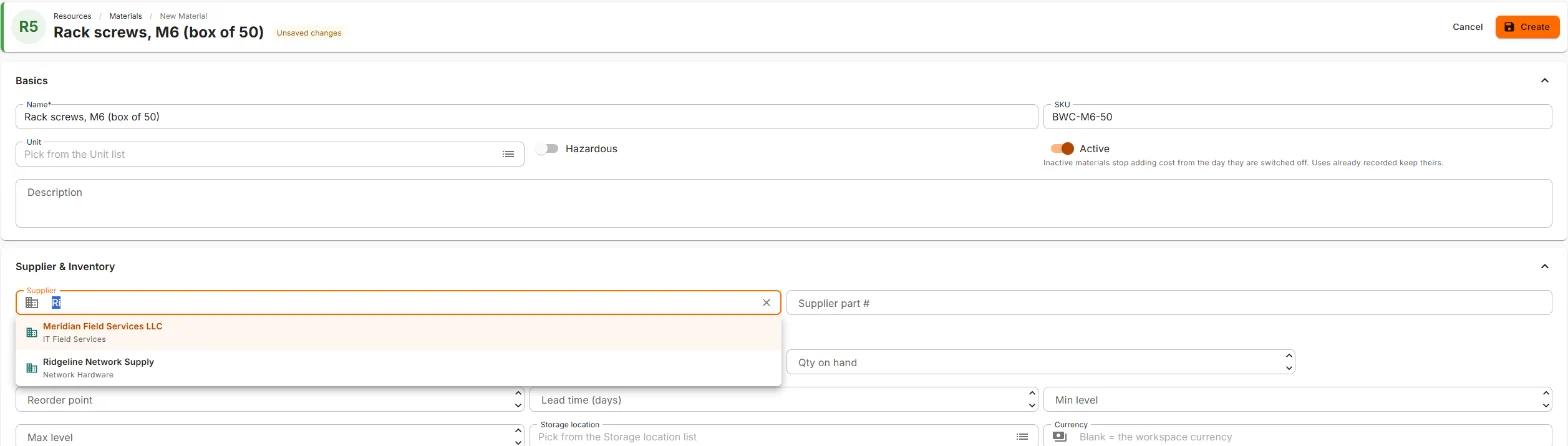
- Required fields carry an asterisk: a contact's First name and Last name, a cost's Name and Amount, a subscription's Service, and every other section's Name.
- Lists the workspace keeps, like Department, Industry, Unit, Category and Location, say Pick from the ... list. Pick a value. An Admin or the Owner can type a new one and choose Add "..." to the list; everyone else asks an admin. It keeps "Laptop", "laptop" and "LAPTOP" from becoming three things.
- Organization fields search as you type. Can't find it? Add "..." as a new organization creates it on the spot. The Open icon beside the field jumps to it.
- Organization names are unique. Try to add a second "Helix Dynamics" and Nexus points you to the first one.
Is this the same person?
When you create a contact with the same email, or the same first and last name, as one you can see, Nexus asks Is this the same person? and shows the match. Use existing opens that one instead. Create anyway goes ahead. Back returns you to the form.
A record's page
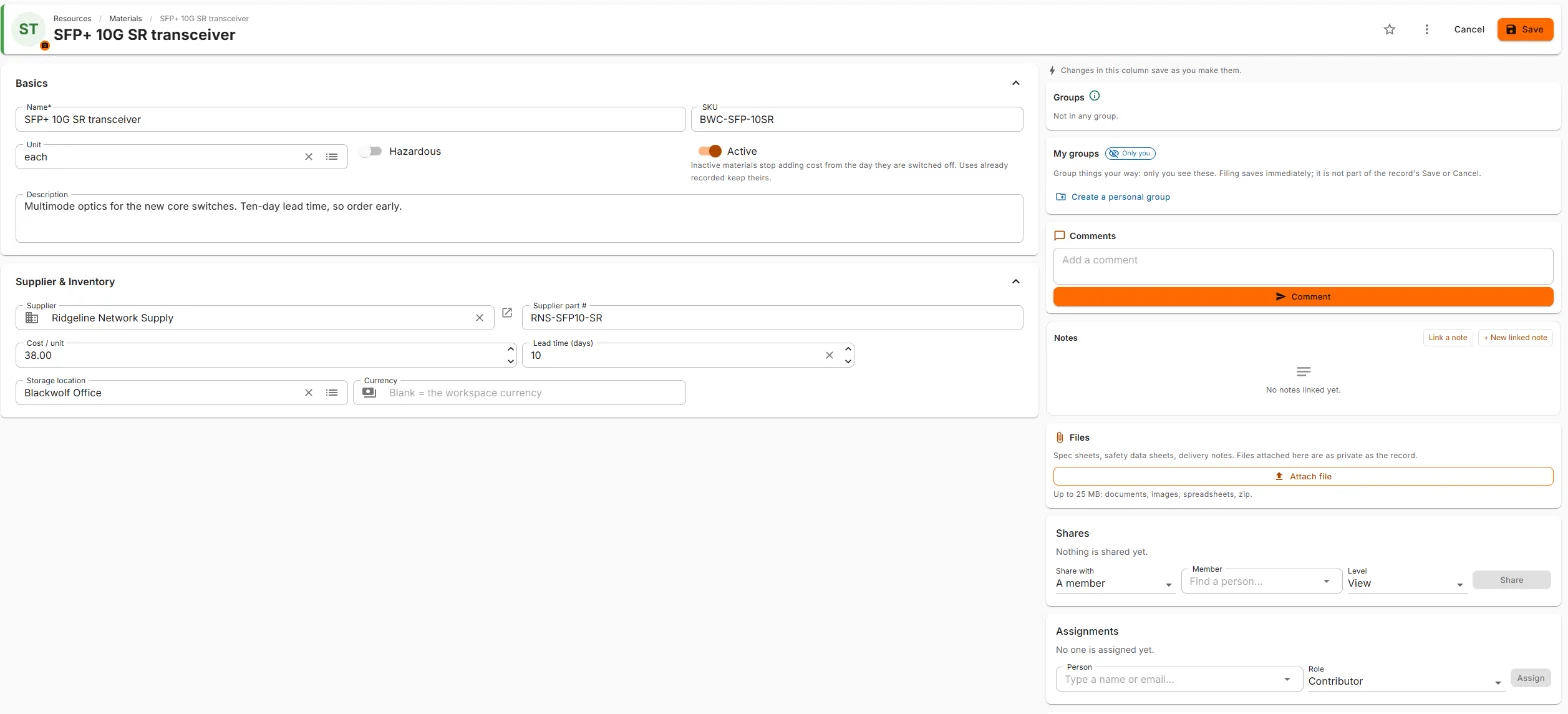
At the top: the photo (click it to change it, up to 25 MB), the name, any needs-attention chips, the star, the ⋮ menu, Cancel and Save.
The form is on the left. Change it and click Save. Sections like Address start folded; click a heading to open it.
The right-hand column saves as you go. No Save needed there.
Saving
- Leave with unsaved changes and Nexus asks first: Keep editing, Discard changes, or Save and close.
- If someone else saved the record while you were editing, Save stops and says who changed what, with Reload. Nothing gets overwritten. Your typing stays on screen until you reload, so copy anything you want to keep.
- A field with a problem says so in red underneath, as you type: an email without an @, a phone number with letters in it.
The right-hand column
| Card | What it does |
|---|---|
| Groups | Which workspace groups the record is in. Add to group, or the ✕ on a group to take it out |
| My groups | Your personal groups. Tick one to file the record there |
| Comments | Quick notes on the record. Pin one to the top, edit or delete your own |
| Notes | Pages from Notes linked to this record. Link a note or + New linked note |
| Files | Spec sheets, invoices, warranties. Up to 25 MB each: documents, images, spreadsheets, zip |
| Shares | Who else can see it, and at what level |
| Assignments | People with a role on the record: Owner, Contributor, Reviewer or Observer |
| Stock | Materials on Pro. See Stock, below |
| Used in | The tasks, projects and programs this record is linked to |
| Record | When it was created and last modified |
An organization also has Linked records: every contact, material, piece of equipment, cost and subscription that names it, with View all to open them in their section.
What's different about contacts
Contacts are people, so they get a little extra care.
- Who changes what. On a teammate's card, their name, email, title, department and employer are kept by HR and the workspace Admin. Their address, phones, birthday and cost are seen and changed only by them, their manager and HR. Everyone else sees the basics.
- Preferences, Web & Social and Family are marked Only you. They're your own notes about the person: their nickname, their coffee order, their kids' names. Nobody else sees them, not even the person.
- Yours shares those notes with a member or a group, when you want to. Shared with nobody. Only you see it until you do.
- Family: turn on Has spouse or Has children, then Add spouse or Add child.
- Availability & Cost: Max hours / day and Cost / hour drive planned hours and project cost. Hours already logged keep the rate they were logged at.
- Active: off means they've left. They stay on the org chart and on work already assigned, drop out of assignee pickers, and HR is asked to give their reports a new manager.
- Resource DNA opens their skills profile. It comes with the Enterprise plan.
- Reporting shows who they report to and who reports to them, with Open in org chart. HR and their manager can Change manager.
- Your own card says Me. Share your team up lets you share your reports' time and growth with your own manager, for a window you choose.
What's different about the others
- Organizations can be promoted to a client account (Promote to client account) on the Enterprise plan.
- Equipment keeps Last service, Next service, Warranty expires, a Flat rate and a Cost / hour.
- Costs and Subscriptions can repeat. Turn on Recurring, then set every how many Day, Week, Month or Year, and how many Occurrences (blank means no end). A line underneath reads it back: Every 1 week, with no end, from Oct 24, 2026.
- Subscriptions have Auto-renews. Off means it ends at its renewal date instead of repeating.
- Inactive materials and subscriptions stop adding cost from the day they're switched off. What was already used keeps its cost.
Stock
On Pro, every material gets a Stock card, and so does every row of a Smart List section you choose to track. The one rule behind it: nobody types the on-hand number. Every change is a movement with a reason, a person and a time, and the count is what they add up to. That's why you can trust it.
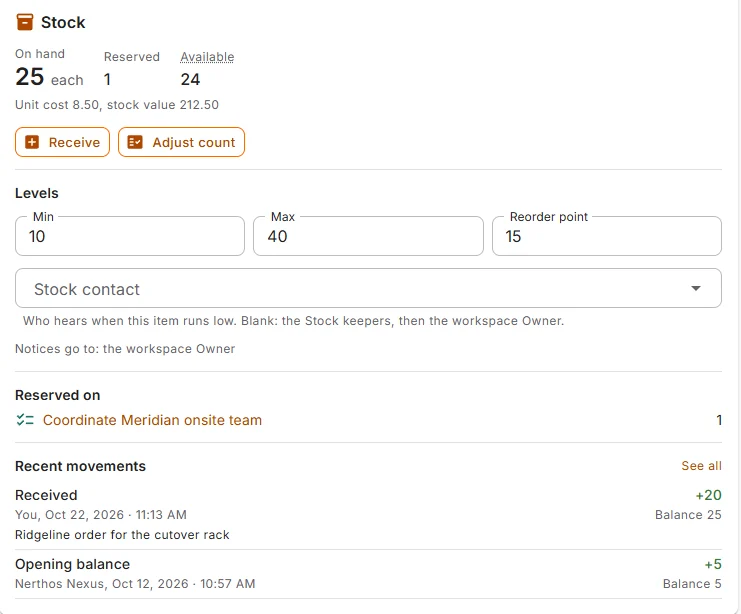
Three numbers
| Number | What it means |
|---|---|
| On hand | What is physically on the shelf |
| Reserved | What open work has claimed but not used yet |
| Available | On hand minus Reserved: what's free to promise |
The first time a material's card opens, its old Qty on hand becomes the opening balance. From then on the card owns On hand, Min, Max and Reorder point, and the material's form stops showing them, so there's only one place to change them.
Receive
For when the delivery shows up. Click Receive, enter the Quantity received, and optionally a Unit cost and a Note. Nexus shows the result before you commit: On hand goes from 5 to 25 (+20). A unit cost you enter becomes the item's cost per unit from then on. Leave it blank to keep the current one.
Adjust count
For when the shelf and the screen disagree. (The shelf is right.) Click Adjust count, enter what you Counted, and pick a Reason: Count, Damaged, Lost, Found or Other. Nexus records the difference, so the history still adds up. Save count waits until the count actually differs from On hand.
Levels
Set Min, Max and Reorder point, and choose a Stock contact: the person who hears when this item runs low. Leave it blank and notices go to everyone with the Stock keeper role, and if nobody has it, to the workspace Owner. Save levels keeps them.
A level can't be negative, and Min can't sit above Max.
Reserved on, and recent movements
Reserved on lists the work that has claimed this item, and how much. Recent movements shows the latest changes, each with who, when and the balance after. See all opens the full history in the Stock movements report.
Who can change stock
Anyone who can see an item can see its stock. To receive, adjust or set levels you need one of these: Edit on the item, the Stock keeper role, to have created the item, or to be the workspace Owner.
Flags and notices
| Flag | When it shows | Notice sent? |
|---|---|---|
| Negative | On hand is below zero | Yes |
| Below minimum | On hand is under Min | Yes |
| Reorder | Available is at or under the Reorder point | Yes |
| Over maximum | On hand is over Max | No, it's just a flag |
A notice goes out once, when an item crosses the line. It doesn't go again until the item has recovered and crossed again, and when it recovers the old notice is taken back. Helpful, not naggy.
Stock that moves with the work
This is the part that does the bookkeeping for you.
- Link a material to a task, project or program with a quantity, and that quantity is Reserved.
- Complete the work and Nexus asks Confirm materials used, with the planned amounts filled in. Change any that differ from the plan, then click Complete. The stock comes off the shelf.
- Reopen the work and what was used goes back to Reserved. Cancel it, or move it to the bin, and its reservations are released.
- Not enough on the shelf? Nexus warns you and lets you go ahead anyway. Work shouldn't wait on a spreadsheet.
- When an automation or an import completes the work, Nexus uses the planned amounts and marks them Not confirmed. Anyone who can edit the work can correct the amount used on its Resources panel.
- A material reserved on open work can't be deleted until that work is completed or released.
On other plans
Below Pro, materials keep their plain Qty on hand and level fields, and there are no stock cards. A workspace that drops below Pro keeps its counts, frozen: Stock is frozen. Counts are kept but cannot change on this plan.
Groups
A section always shows everything. A group is a smaller list inside it: a Contacts group called Helix cutover team, a Materials group per job site. A record can be in as many groups as you like.
There are two kinds.
| Workspace groups | My groups | |
|---|---|---|
| Who sees it | Everyone in the workspace | Only you |
| Who creates it | A workspace Admin or the Owner | Anyone |
| Who files records in it | Whoever created it, an Admin or the Owner, and they need Edit on the record | You, for any record you can see |
| On Free | Up to 2 | As many as you like |
Filing a record in a personal group never changes the record for anyone else. It's your private filing.
Making a group
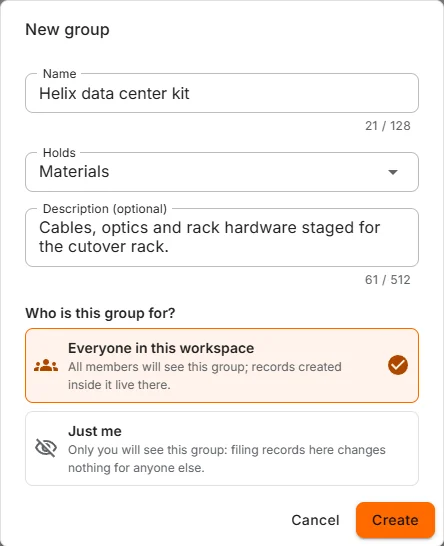
Click New group (or New personal group) on the Resources page. Give it a Name, choose what it Holds (Contacts, Materials and so on), and add a Description if you like. Admins also choose Who is this group for?: Everyone in this workspace or Just me. Click Create and the group opens.
Putting records in a group
- From the group's page, Add existing finds records by name. Tick them and click Add.
- From the group's page, New Contact (and so on) creates a record that starts life in the group.
- From any record, the Groups and My groups cards on the right. These save straight away, separate from the record's Save.
To take one out, use Remove from this group on its ⋮, or the ✕ on its Groups card. The record itself stays exactly as it is.
A group's own form
A workspace group can have its own fields (see Customize, below). When a record is in more than one group with its own fields, its Groups card marks which group's form it uses, and Use another group's form switches.
Renaming and deleting
Customize: make a section yours
The tune icon on a section's list opens Customize. What you can do depends on who you are.
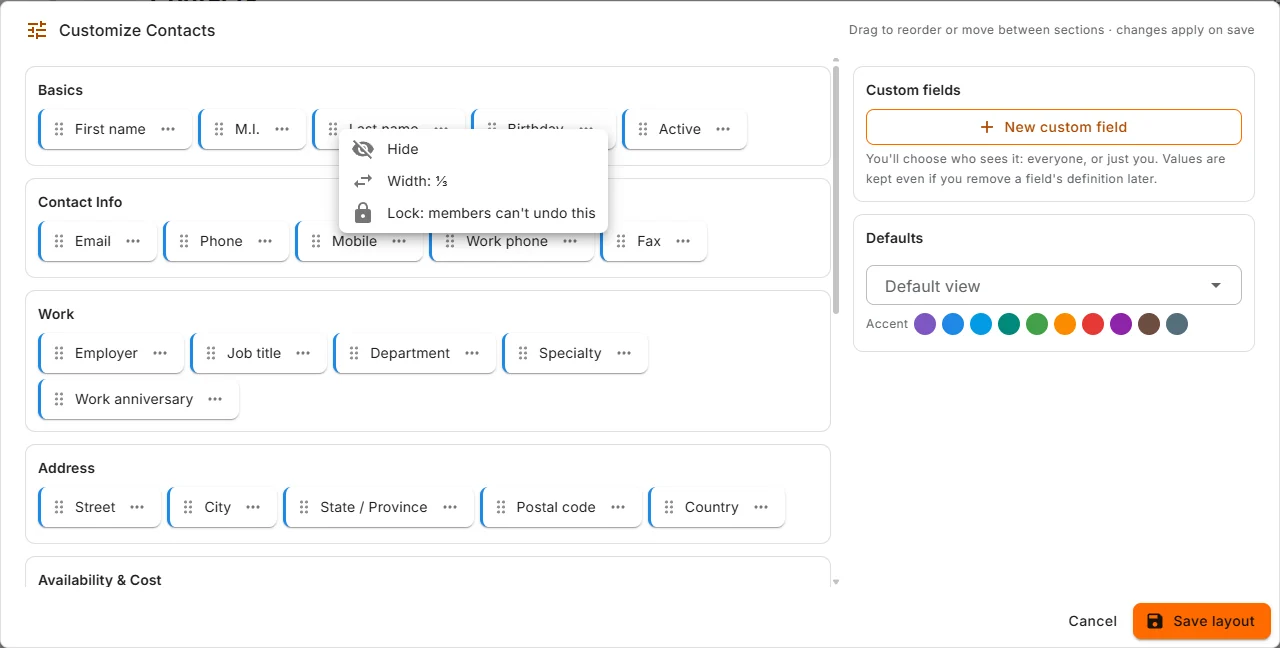
Everyone can personalize a section for themselves: hide fields they never use, drag fields into a different order, change a field's width, and add custom fields only they can see. Changes here apply only to you, no one else will notice a thing.
A workspace Admin or the Owner changes the section for everyone, and can still make "just me" changes. When an admin hides or shows a field, Nexus asks Who is this change for? An admin can also Lock a field so members can't change it for themselves.
Custom fields
New custom field adds a field of your own. Pick a Label, a Type and the section of the form to Place it in, and whether it's Required.
The types are Text, Long text, Number, Currency, Date, Checkbox, Dropdown (options), Web link and Link to a record. The type can't be changed later.
- Members' new fields are theirs alone.
- An admin chooses Who should see this field?: everyone, or just them.
- Making an existing field required, when some records are missing it, asks whether to require it for every record or new records only.
- Remove field takes it off the form. The values stay stored, so adding it back brings them back.
Defaults
- Default view: the view the section opens in. Admins only.
- Kanban columns from: the dropdown field that makes the Kanban columns, when the default view is Kanban.
- Accent: the section's colour. Admins only.
Click Save layout (or Save my layout). Reset to workspace layout clears all your personal changes to the section and goes back to the workspace's.
Opened from a workspace group's page, Customize changes the form for that group only.
Your sections (from Smart Lists)
When a Smart List grows up, you can turn it into a section, and it appears on the Resources page under Your sections. Its records open like any other resource, with the right-hand column, comments and files.
A few things are different:
- Its columns are designed in the Smart List designer, so Customize is personal only.
- It has Export, to an Excel workbook or a CSV file, keeping your current search, sort and star filter.
- Its ⋮ has Section settings… (name, description, the name for one item, colour and icon), Track stock… and Delete section.
- It doesn't have groups, Group by or needs-attention flags.
Tracking stock in a section
Track stock… turns a section into an inventory, on Pro. Choose which Number column is On hand (or Add an On hand column), and optionally Min level, Max level, Reorder point and Unit cost. Each row then gets a stock card just like a material, and a row with a unit cost adds its cost to the work that uses it.
Turning it off writes each row's last count back into its On hand column. The history is kept.
Deleting a section
Delete section moves the section and its records to Recently deleted sections on the Resources page. Restore brings it back as a section, with its records. After the workspace's retention period (30 days unless your workspace says otherwise), it's deleted for good. A section that tracks stock can't be deleted until Track stock is turned off.
Resources on your work
Tasks, projects and programs each have a Resources panel. This is where resources earn their keep.
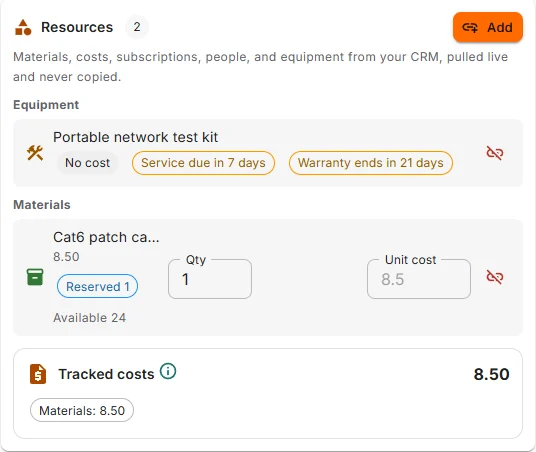
Click Add to open the picker:
- Choose sources: the sections, groups and Smart List sections you want to pick from. Nexus remembers your choice for that piece of work.
- Pick: search, then Add what you need. Materials and stocked rows take a quantity. Can't find it? Type a name and Create & link makes a new one on the spot.
- Purpose (optional) says why it's there, and Done closes the picker.
A whole group can be linked too. It stays live: anyone added to the group later shows up on the work as well. Linking a whole group never reserves stock.
On the panel:
- Materials, costs and subscriptions show their cost, and on Pro the Tracked costs total adds them up for the work. A recurring cost only counts the times it falls between the work's start and end.
- People and equipment say No cost. Their cost comes from the roster and the hours, not from being linked.
- Stock items show what's reserved and what's available, or Short by how many.
- The remove icon on a line takes it off the work. The record itself is untouched. Once a material has been used, the link stays, so the history adds up.
Adding resources to work comes with the Pro plan. Links already there stay readable on any plan.
Who can see a record
A record is seen by whoever created it and anyone it's shared with.
- Shares gives a member, a group, or (for a configuration Admin) the Whole workspace one of four levels: View, Comment, Edit or Admin. Only someone with Admin on the record can share it.
- Publish to workspace on the ⋮ lets everyone read it. That's a configuration Admin's call.
- A teammate's card isn't shared at all. Everyone in the workspace sees their name, title and department; the rest belongs to them, their manager and HR.
When you can see a record but not change it, the page says You can view this record. Ask its owner for Edit to change it.
Deleting and bringing back
⋮ → Delete asks first. It tells you where the record is used (used on 2 tasks and 1 project), what will happen there while it's deleted, and how long the recycle bin keeps it. Then it's in the recycle bin, ready to restore.
Some records won't go, and Nexus says why:
- A teammate's card, while they're a member.
- A contact who manages people, until their reports have a new manager. Nexus offers to move them up a level for you.
- An organization that is a client account's client or a contract's counterparty.
- A material reserved on open work.
Common questions
Why can't I find a record I know exists? It may not be shared with you. Resources only shows what you can see, and the counts on the Resources page are your counts.
Why can't I type a new Department (or Unit, or Category)? Those lists are kept by the workspace, so they stay tidy. Pick from the list, or ask an Admin to add your value.
Why does my teammate's card say I can't change their title? Names, titles and departments are kept by HR and the workspace Admin. Ask them.
Who else sees my notes about a contact? Nobody. Preferences, Web & Social and Family are yours alone until you share them from Yours.
Why is the Kanban button greyed out? The section needs a dropdown custom field and an admin to set Kanban as its default view in Customize.
Why does a person on my task say No cost? People and equipment cost what their hours cost, through the roster. Linking them doesn't add a second charge.
Why can't I type On hand? Because then nobody could say why it changed. Use Receive for deliveries and Adjust count for everything else.
On hand is negative. Is something broken? No. Work was completed with more than the shelf held. Nexus lets that happen rather than block the job, and flags it so someone counts.
Why can't I delete this material? It's reserved on open work. Complete or release the work first.
I deleted a group by mistake. The records are all still there; only the group went. Groups can't be restored, so make it again and add them back.